")


The Xslicer SMX-1010/1020 is a vertical emission X-ray system equipped with 90 kV microfocus X-ray generator and a high-resolution flat panel detector. Image quality has been significantly improved over the previous model (SMX-1000 Plus), and Shimadzu’ s renowned operability has advanced even further. In addition to operability improvements, the stage movement speed and detector acquisition speed have also increased, significantly shortening inspection times. The inspection process is now more efficient. The workflow has also been simplified for the CT unit (optionally available), and operability has been improved. With the Xslicer SMX-1010/1020, everything from X-ray fluoroscopic inspections of surface mounted circuit boards, sensors, and harnesses to 3D defect analysis using CT can be accomplished with a single unit.
High Image Quality Exceeding the Level of General-Purpose Models
Equipped with ultra-high-resolution 3 megapixel flat panel detector*
*Xslicer SMX-1020
The Xslicer SMX-1020 is equipped with a 3 megapixel flat panel detector. Users can assess internal structures or defects in detail
while observing a wide field of view.
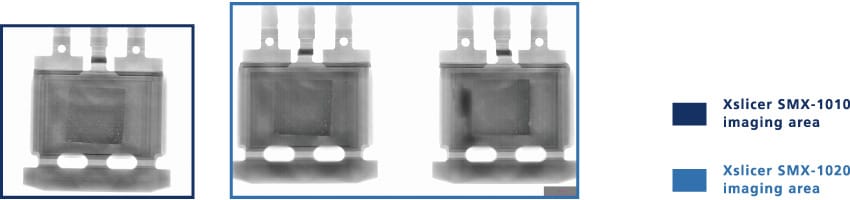
The Xslicer SMX-1020 can inspect sizes with twice the field of view as the SMX-1010.

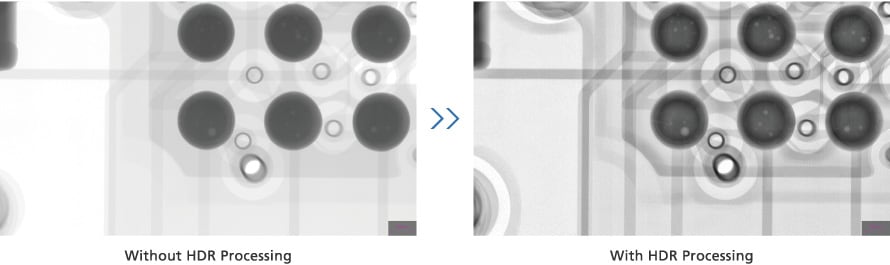
New HDR Processing Function
Shimadzu’s unique, proprietary image processing technique/algorithm allows fluoroscopic images with a higher dynamic range. Regions that are both easy and difficult to penetrate can be observed at the same time, which shortens inspection times.
Software Significantly Shortens Inspection Times
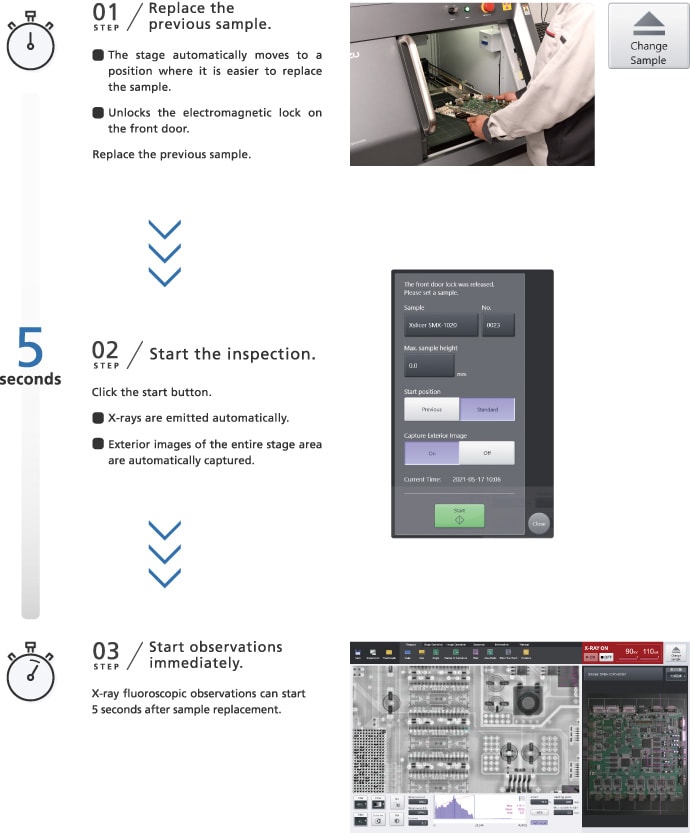
Inspections Start in 3 Steps and 5 Seconds
Just a 3-step process before starting observations. After the start button is clicked, X-ray emission and exterior camera imaging are
automatic. X-ray fluoroscopic imaging can start 5 seconds after sample placement (4.6 times faster than the previous model).
Simple Operation
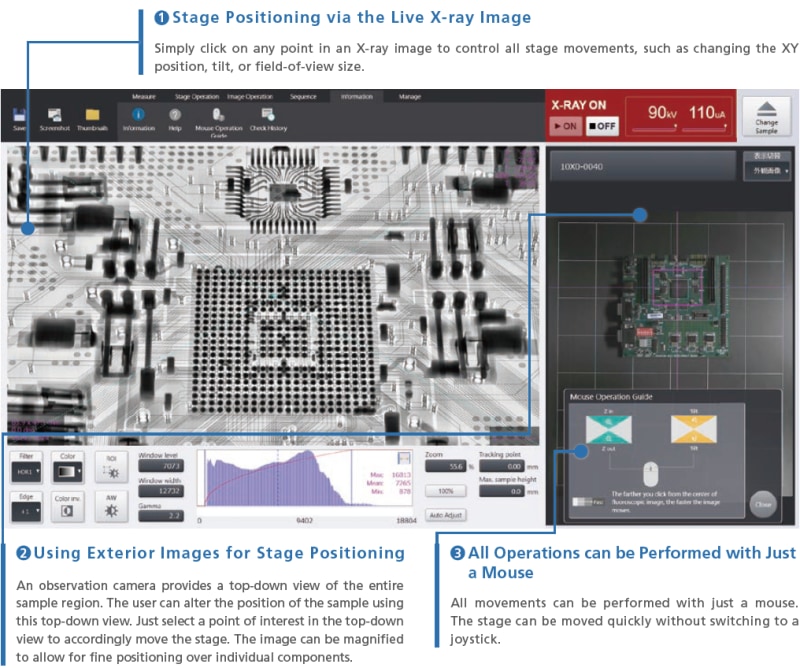
Simple UI and Easy Positioning Operations
A large monitor screen and simple button layout provide excellent visibility for intuitive operability. X-ray inspections can be performed easily, even by operators using the system for the first time.
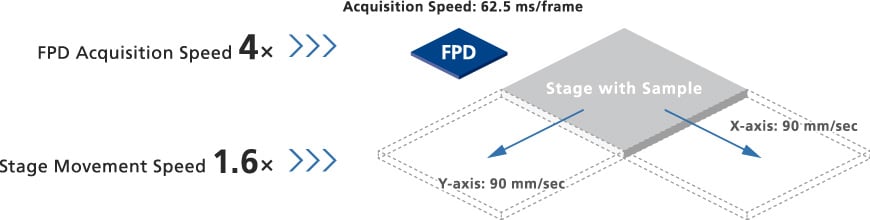
Faster Detector Acquisition and Stage Movements
The flat panel detector acquisition is 4× faster than the previous model, and the stage movement (XY direction) is 1.6× faster. In addition to ordinary use, this contributes to faster tact times during consecutive inspections.
Example of Continuous Inspections Using the Step Feed Function
Inspection times were compared for consecutive X-ray inspections of 25 samples using the step feed function on the previous SMX-1000 Plus and the SMX-1020. Inspection times are approximately 40 % shorter in comparison to the SMX-1000 Plus.
Additionally, X-ray emission times are reduced by at least 35 %, which also reduces running costs. The time reduction ratio increases as the number of samples increases.

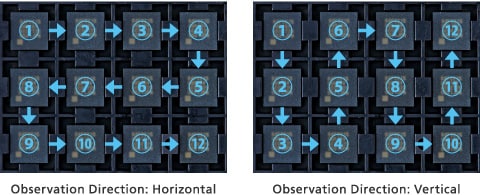
Samples arranged at fixed intervals can be observed consecutively. The starting position, movement amount, and number of movements can be specified. During implementation, consecutive movements and observations are made in accordance with the settings from the start position. After the inspection, a table of the pass/ fail/hold results can be displayed.
Inspections with the Xslicer SMX-1020 Take Half the Time of the Xslicer SMX-1010
The Xslicer SMX-1020 can inspect twice the horizontal area of the SMX-1010. The area in a single inspection is twice the size, so the inspection takes about 1/2 the time. The time can be shortened even more in consecutive inspections of samples arranged on a pallet.
Diverse Functions Provide 3D Analysis with a Single Unit
Simple CT Function with High Image Quality (Optionally Available)
Simply position the compact CT unit on the fluoroscopic stage and switch the software tab to enable 3D analyses unobservable with fluoroscopic functions. There is no need to switch software programs, so CT imaging can start easily.
Automated Calibration (Shorten the time for process before imaging by 80 %)
Calibration has been automated, simplifying CT imaging. There is no need for calibration each time a sample is loaded as previously. Imaging is started simply by selecting either [Simple], [Normal], or [Fine].
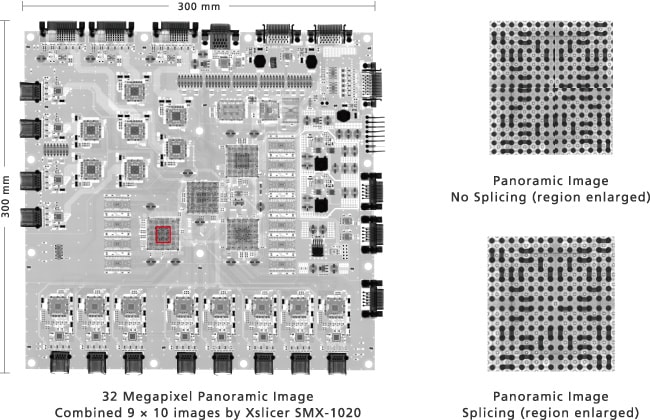
Panoramic Imaging Function
A wide X-ray fluoroscopic image can be obtained just by specifying the imaging range on the exterior image. An improved stitching process ensures a panoramic X-ray fluoroscopic image up to 32 megapixels in size can be obtained with no conspicuous marks where the images are spliced together.
| Imaging Mode | Pixels | 300 × 350 mm Scanning time for entire range | |
|---|---|---|---|
| Simple | Equivalent to 2K (full HD) in size | Approx. 2 million pixels | SMX-1010 : 115 sec / SMX-1020 : 100 sec |
| Normal | Equivalent to 4K in size | Approx. 8 million pixels | SMX-1010 : 135 sec* / SMX-1020 : 120 sec |
| Fine | Equivalent to 8K in size | Approx. 32 million pixels | SMX-1010 : 590 sec / SMX-1020 : 495 sec |
*The SMX-1000 Plus takes 395 seconds at the fastest.
Image Adjustment Functions
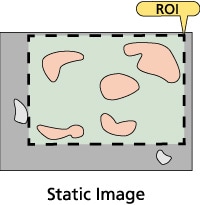
(Auto Window Function and Area of Interest Function)
The contrast can be automatically optimized to make the area of interest easy to see.
Image Measurement Functions
Ball Grid Array (BGA) Measurements
BGA bump diameters and void ratios can be measured.
With our proprietar y image proces sing algorithm, compl icated parameter set tings are unnecessary.*
Multiple settings can be saved and applicable ones can be accessed for each inspection target prior to measurement.
* Manual adjustments may be required depending on the sample.

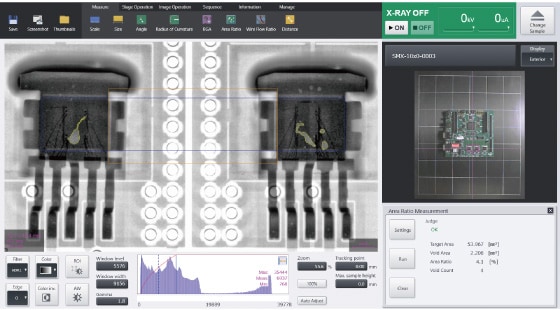
Area Ratio Measurements
Die bonds, solder paste wettability, and other area ratios can be measured.
The parameter settings are not required thanks to Shimadzu’s proprietary image processing algorithm.*
It is also possible to save multiple settings, and then call up the applicable settings for each inspection target prior to measurement. Furthermore, pass/fail determinations can be made based on the area ratio.
* Manual adjustments may be required depending on the sample.
* The measurement range (ROI) can be configured manually.
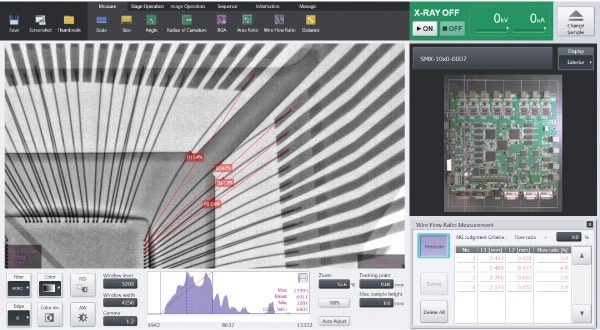
Wire Sweep Ratio Measurements
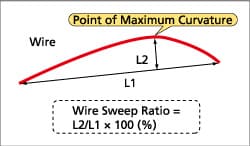
The wire sweep ratio can be measured by specifying both ends of the bonding wire and the point of maximum curvature.
Pass/fail determinations can be made depending on the wire sweep ratio.
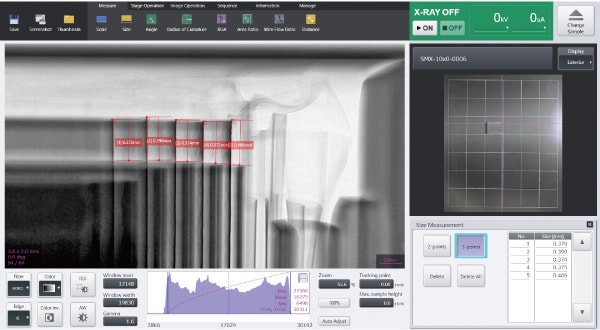
Dimension Measurements
The Xslicer SMX-1010/1020 supports both 2-point distance and 3-point measurements.
With this system, sizes are measured efficiently by calculating calibration data internally in synchronization with the fluoroscopic magnification.
A Wealth of Functions for Facilitating Inspections
Teaching Function
Fluoroscopic and CT imaging can be automated using the Teaching Function, which moves the sample stage to preregistered points of interest.
Additionally, for visual inspection, OK and NG judgment functions are included.
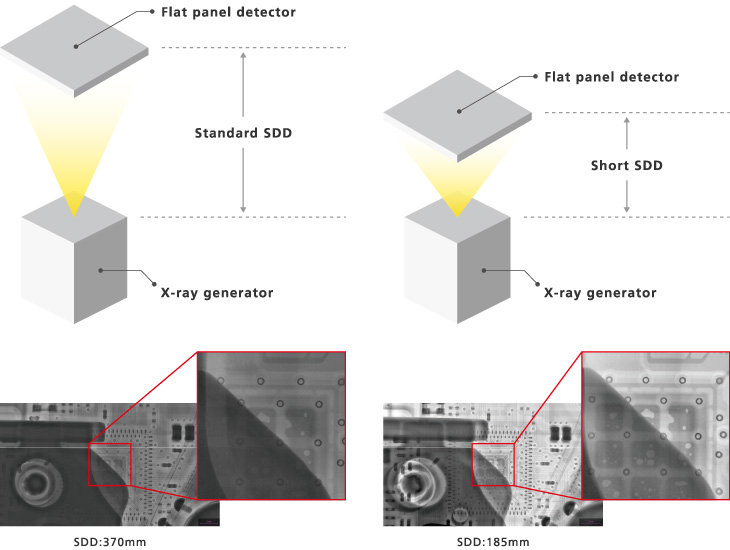
Shortened Source-Detector Distance (SDD) Function
The distance from the X-ray generator to the X-ray detector (SDD) can be switched to 185 mm (The standard distance is 370 mm) By shortening the SDD, images with sufficient penetration can be obtained even for samples that are hard to penetrate.
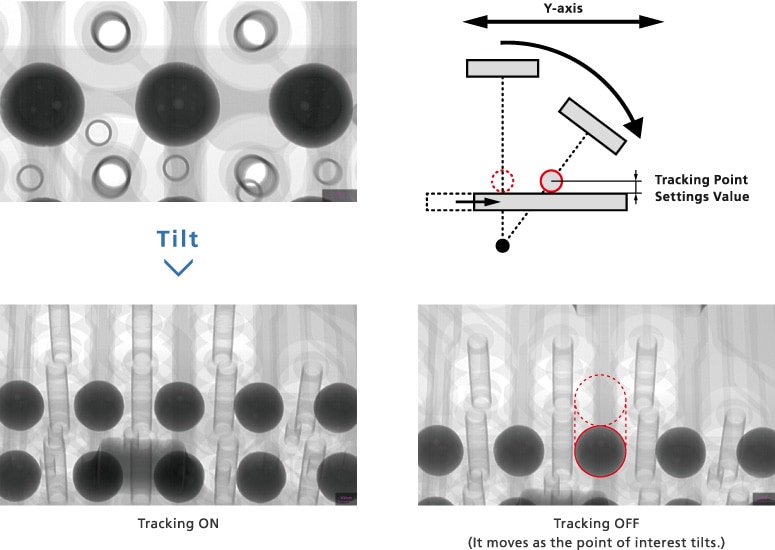
Inclined Fluoroscopy Function
The flat panel detector can be tilted up to 60 degrees. Since the detector tilts, the sample does not need to be fixed. Inclined fluoroscopy ensures that the specified sites are particularly easy to see.
- Detector not tilted
- Detector tilted 60 degrees
Set Tracking Points Easily
If a tracking point is set, the observation position of interest when tilted and rotated never leaves the center of the window.
As a result, the point of interest is never lost.
To set a tracking point, simply tilt the detector and double click the position of interest.